- Getting Started!
- Building EX Surveys
- EX Metrics
- EX Dashboard
- EX Dashboard Settings
- Analyze your drivers
- Good to know
- Getting Started!
- Why Sogolytics
- Getting Started with Sogolytics
- Tour
- Home
- Verify My Account
- Account Creation
- Introduction to Packages
- Mobile App
- Design
- Introduction to Project Design
- Project Types
- Create a Project
- Question Types
- Question Types
- Add a Question
- Mobile Friendly Questions
- Edit a Question
- Introduction to Simple Question Types
- Introduction to Grid Questions
- Horizontal Radio Button
- Descriptive Text
- Text Box
- Radio Button (Single-Select)
- Drop Down
- Check Box (Multi-Select)
- Demographic
- Rating Scale
- Symbol Rating Scale
- Like/Dislike
- Ranking
- Date
- Image Choice
- Net Promoter Score (NPS)
- Multiple Text Box
- Multiple Drop Down
- Radio Grid
- Check Box Grid
- Rating Radio Grid
- Rating Drop Down Grid
- Rating Scale Grid
- Matrix Grid
- Advanced Questions and Elements
- Page Break
- Captcha
- List Box
- Rating Drop Down
- Rating Radio Button
- Attachment
- Numeric Allocation
- Drill-Down
- Signature
- Re-use Questions and Answers
- Project Logic
- Advanced Design Options
- Page Action
- Project Tools
- Project Options
- Question Sequence
- Introduction to Project Options
- Project Details
- Add Languages
- Anonymous Project
- Display Options
- Event Messages
- Save and Continue Later
- Thank You Message
- Reopen Submitted Responses
- URL Redirect: Static and Dynamic
- Print Options
- Expiry Rules
- Switch Project Type
- Use Chain Invitations to Share Surveys
- Enhanced Participation
- Automatic Email Alerts
- Question Features
- Project Branding and and White Labeling
- Project Customization
- Good to Know
- Distribute
- Introduction
- Publish Project
- Other Publishing Options
- Automated Distribution
- Invitation Templates
- Contact Lists
- Reminders
- Customizing Participation
- Good to Know
- Directory
- Introduction to Directories
- Build Your Directory
- Activity in Directories
- Participation
- Track
- Report
- Introduction to Reports
- Run a Report
- Omni All in One Report
- Text Analysis
- Frequency Reports
- Individual Responses
- Raw Data
- Special Reports
- Legacy Reports
- Charts and Graphs
- Save, Export, Share Reports
- Filter Manager
- Good to Know
- Custom Dashboard
- Introduction to Custom Dashboard
- Build Your Custom Dashboard
- Dashboard Options
- Widgets
- Filter
- Segmentation
- Data & Security
- Cookie Policy
- Import Options
- Export Data
- GDPR
- HIPAA
- Integrations and API
- Account Administration
- Account Settings
- Account Settings
- Update Personal Information
- Update Company Information
- Account Notifications
- Review Account Usage
- Customize Survey Labels
- Project Allocation
- Linked Account
- View Product Details
- Referral Program
- Payment History
- Billing Information
- Two-Step Authentication
- Account Security
- Recent Account Activity
- Single Sign-On (SSO)
- Outbound Email Settings
- Compliance
- Email Settings
- Project Branding
- Manage Sub-Users
- Good to Know
- Billing
- Introduction
- Sign Up and Upgrade
- Acceptable Payment Methods
- Upgrade a Paid Account
- Payment Receipts
- Change Billing Information
- Upgrade Using Purchase Order
- Referral Benefits Program
- Sogolytics Plans
- Payment Methods Available
- Failed Payment
- Switch to Annual Billing
- Upgrade a Basic/Trial Account
- Sign Up for a Paid Account
- Sogolytics Standard Support
- Downgrade or Cancel Account
- Poll Project
- Good to Know
- FAQs
- Getting Started!
- Building CX Surveys
- CX Metrics
- CX Dashboard
- CX Dashboard Settings
- Analyze your drivers
- Good to know
- Getting Started
- Account Set-up
- Account Administration
- Introduction to Account Administration
- Managing Users
- User Groups
- Landing Pages
- Tab Editor
- Critical Alerts
- Enable Browser Based Notifications
- Customer Feedback Preferences
- Turn Emails into Dialogues
- Account Activity Log
- Define Dialogue Aging
- Create Tags
- Comparison Overview
- Raise a Dialogue with Sogolytics
- Safelisting
- Inbox
- Dialogues
- News
- SogoConnect Dashboard
- Campaigns
- Help
- Getting Started!
- Assessment Question types
- Score and more
- Quiz participation
- Get Results
Net Promoter Score can be viewed in the following Reports:
- Omni
- Bar Graph
- Conditional
- Frequency Table
- Advanced Frequency
- Comparison
- Segmentation
NPS Trend Over Time
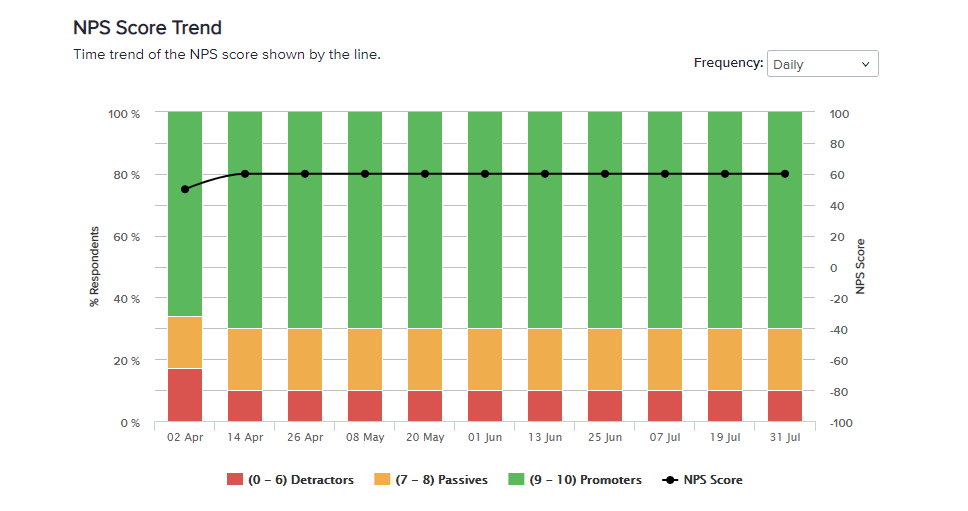
Within Omni, you can track any changes in Net Promoter Score by viewing the NPS Trend.
Here’s how:
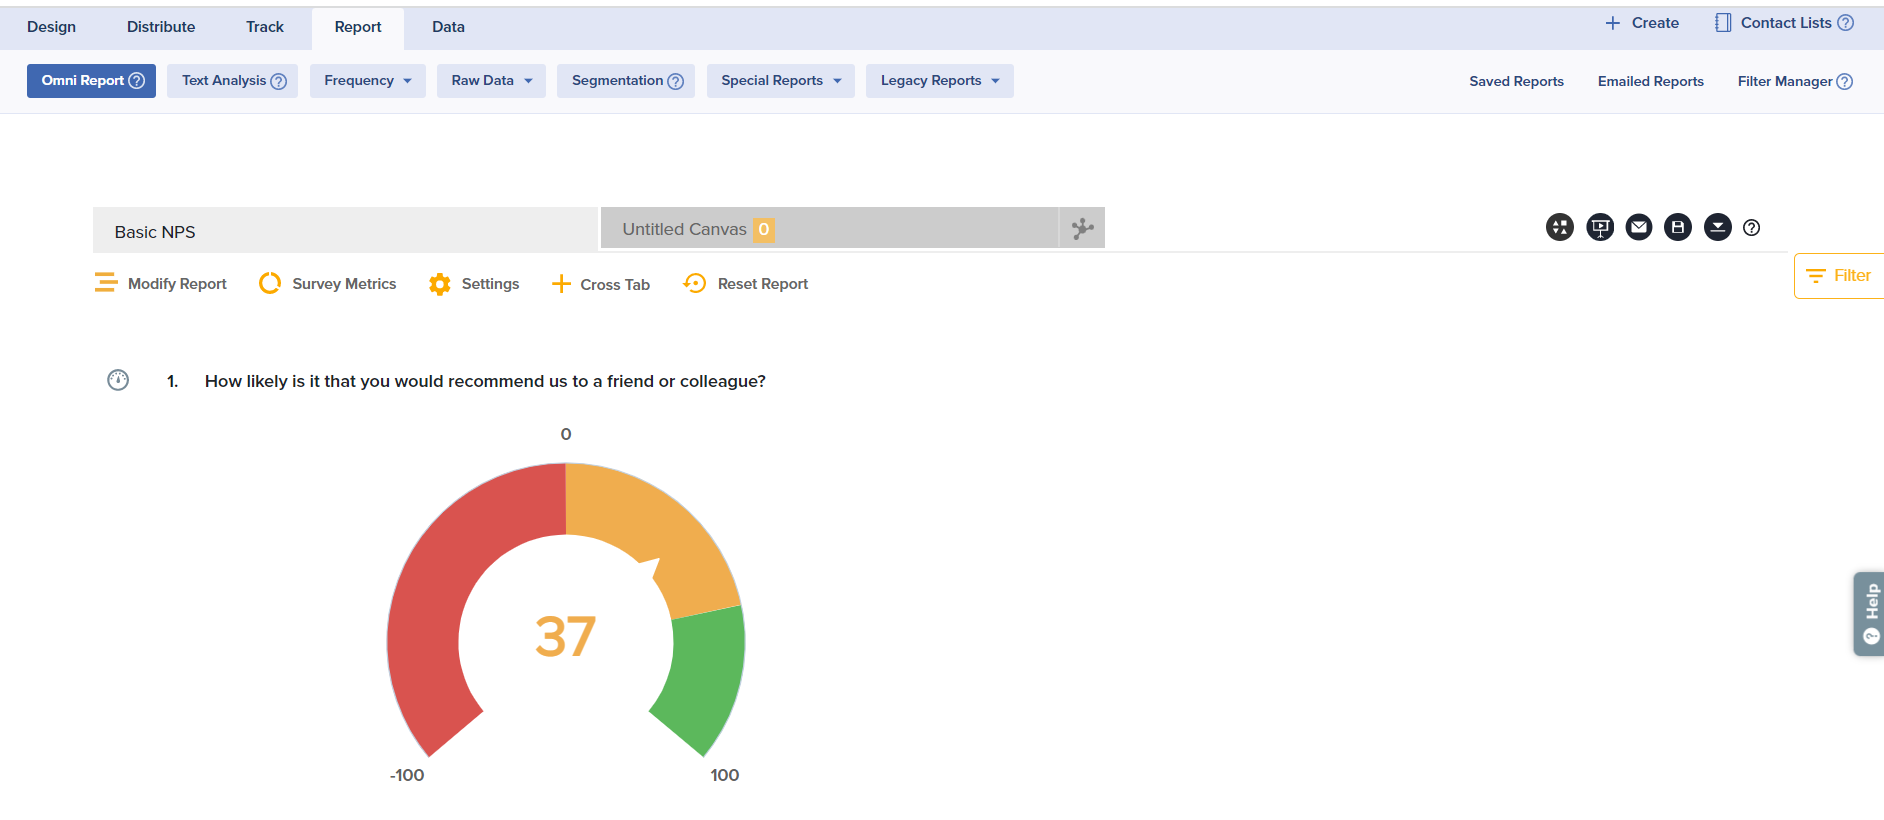
- Within the Omni Report, hover over the text of an NPS question and click on the three dots to the right.
- Select Show NPS Trend. Based on the dates of all the responses, the system will plot the NPS Trend graph. The line shows the NPS trend and the bars in the chart show the breakdown of Detractors, Passives, and Promoters during each time period.
- To change the time period display, use the Frequency dropdown menu.
Within Omni, responses to an NPS question categorize customers as follows:
- Detractors: Customers who provide responses from 0 to 6. These respondents are less satisfied and are unlikely to have a positive impact on your organization. They are unlikely to recommend you and in some cases may even generate negative publicity about you.
- Passives: Customers who choose 7 or 8. These are satisfied but unenthusiastic customers. They may defect to competitors if they see any available benefits.
- Promoters: Customers who pick 9 or 10. These are your brand ambassadors, those you can consider your most loyal and satisfied customers. They are most likely to demonstrate positive behavior like referring new customers and spending more themselves.
Customizations in NPS Trend:
- Hover over the NPS trend graph and click on the 3 dots to the right.
- For Calculation, select Cumulative or Non-Cumulative. Calculations on the graph will be seen as below:
- Cumulative: Shows the cumulative data received up to a designated time.
- Non-Cumulative: The score is calculated only for responses received for the current time (Day, Month, or Quarter).
- For Representation, select Table or Graph.
- Table: The Trend can be represented in table form as shown below.
- Graph: In graph representation, the bar graph or the trend line can hidden.
Segmenting NPS in Omni
- In the Omni Report, navigate to an NPS question.
- To the right of the question itself, click on the three-dot icon to open the Question Options menu.
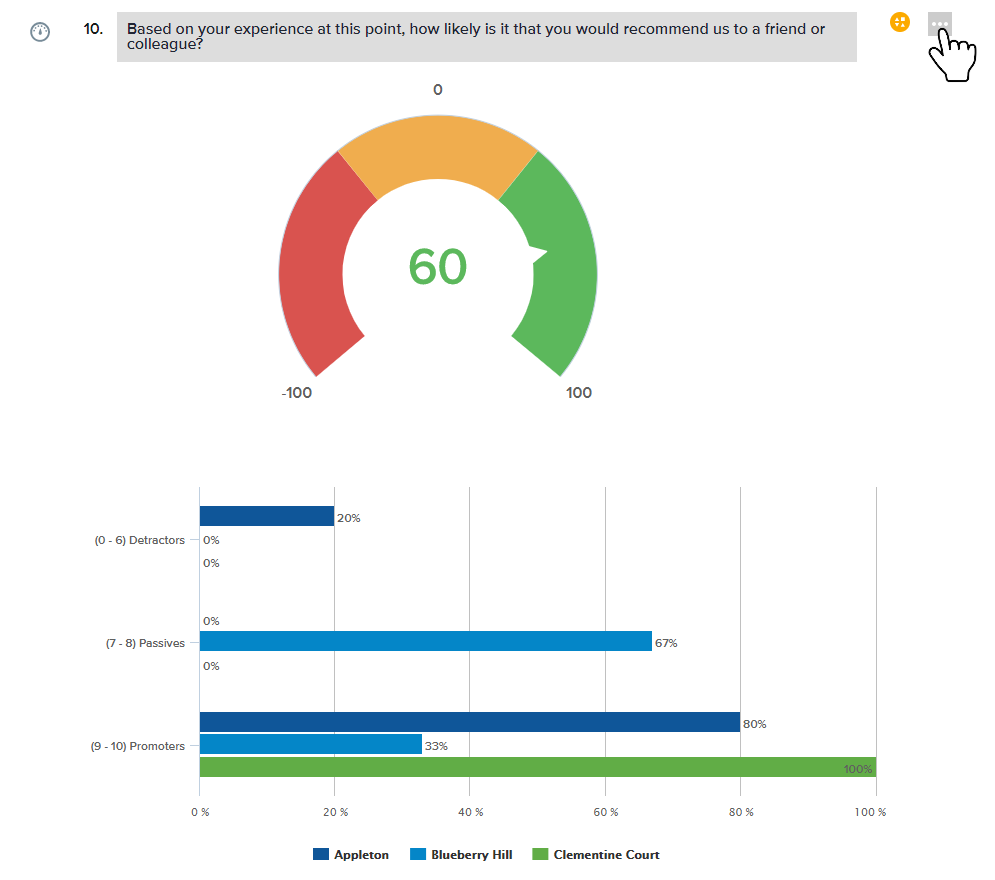
- From the Metric dropdown, select NPS. This updates the bar graph below the dial to display NPS.
- From the same Question Options menu, select Apply Segmentation and define your segments. While the dial will still display the overall NPS, the bar graph below will display the NPS for each segment selected.
In other reports, results of an NPS question will not display the Net Promoter Score, and respondents will not be categorized as Detractors, Passives, or Promoters. Instead, results will be reported as if the NPS question was a Rating Scale question.
Net Promoter Score Calculation:
To calculate the NPS, the percentage of Detractors (those who chose 0-6) is subtracted from the percentage of Promoters (those who chose 9-10).
NPS = Promoters% (9-10) – Detractors% (0-6)
The Net Promoter Score can range between -100 (all Detractors) to +100 (all Promoters). A positive NPS is seen as good, whereas an NPS of +50 is considered excellent.
In calculating NPS, percentages are mathematically rounded, and decimals are not displayed. The responses of the respondents who skip the NPS question are not considered while calculating NPS.
Tags
ScoreSubscribe for tips and insights to drive better decisions!
